Wednesday, October 30, 2013

Colorado River Coffee Roasters

If my recent coffee obsession has taught me anything, it's that fresh beans are a must. Ideally, your coffee beans should be no more than a few weeks from the roast date and they should be ground immediately before use with a quality burr grinder.

That's where CRCR comes in. I was so happy to find that we actually have a quality local roaster. I only recently discovered them even though I've unknowingly had their coffee before at places like Sambalatte and Grouchy John's. You can order their beans online and you'll get a freshly roasted bag. But on this occasion, with my current bag of Redwall Espresso blend pretty much empty, I figured what better time to visit the roastery?

Meeting Erik and Jana, it's clear that this isn't really a job for them; it's a passion. Erik enthusiastically explained everything about the process. It starts with the green coffee beans going into the roasting machine. ("Green" refers to the raw, unroasted bean).


It was fun to see the smaller machines they used before they stepped up their production. Their current roaster features dual infrared burners that supply even heat along the rotating barrel.


The entire roasting process can be computerized to a point where it could run on its own. But that's not how Erik likes to operate. He constantly monitors everything and takes notes.


Once the beans reach their ideal roast, they drop out to cool.


This system has fans that suck air downwards, speeding up the cooling process considerably.


The aroma is incredible.


At this point, all that's left is to bag and tag.


CRCR's bags feature a one-way air valve that allows the beans to keep degassing (releasing CO2). This also allows you to squeeze the bag and sample that wonderful scent.


Our overall visit to CRCR was much more than I anticipated. Not only did we get to see the process first hand, they even brewed up some coffee for us to try. And when I asked about buying their coffee mugs, Erik was kind enough to just let us walk away with a pair.

Tuesday, October 29, 2013

Totor-o'-Lantern


One more Jack-o'-lantern for the road. If you're not familiar with this character, it's from "My Neighbor Totoro," a 1988 animated film by legendary filmmaker Hayao Miyazaki.

The etching of the belly and teeth wasn't as bad as I thought. I just used a paring knife. I cut hard outlines first and then etched out the pumpkin skin. It might have helped that we actually started the main carving a few days ago. After sitting in the fridge for a few days, the pumpkin flesh became softer. I then put both of our pumpkins in a water bath with a bit of bleach (to help prevent mould). This completely rehydrated the pumpkins and they are nice and hard again—just like new!


Monday, October 28, 2013

The Eight Gates of Seoul

I knew about Sungnyemun coming into our trip, but as I explored the city, I learned that there were actually eight gates. This dates back to when Seoul was a walled fortress. They had four great gates and four small gates. Of course, I'm crazy enough that I just had to make it a point to capture them all.

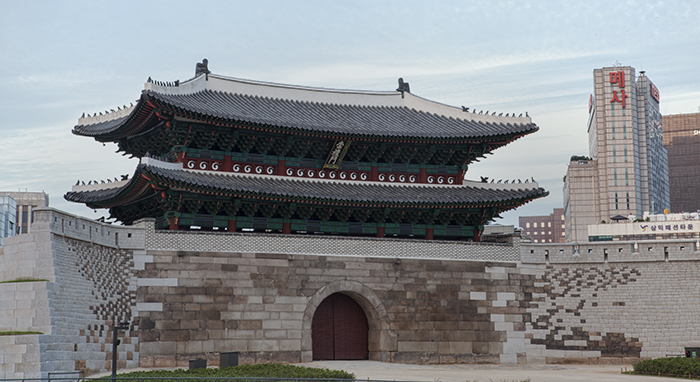
Of the eight gates, only six still exist. Unfortunately, of those six, I only got around to five of them (I'll explain later). I'll start with what is officially called Heunginjimun. This great gate is more commonly referred to by its directional name, Dongdaemun (literally "east great gate").


I've already blogged about Sungnyemun (official name). Directionally, this is the city's "south great gate," otherwise known as Namdaemun. Unsurprisingly, it sits right by the Namdaemun street market.


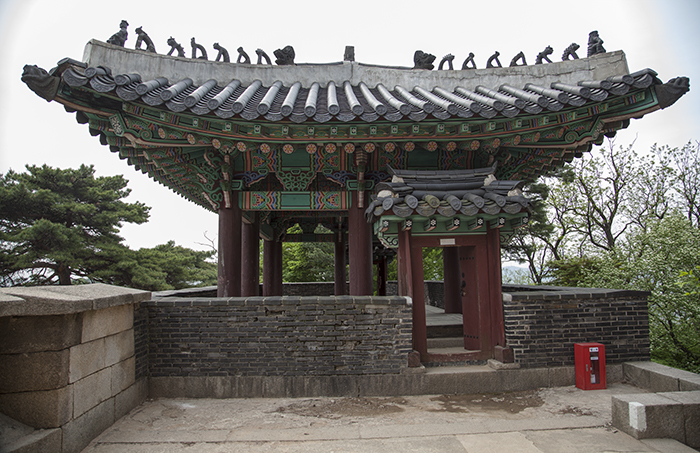
The final great gate that still exists is Sukjeongmun (also known as Bukdaemun or "north great gate"). Structurally, this one isn't as "great" as the others because it sits on top of a mountain and was used less frequently. To access this gate, you need to hike up the mountain along the Seoul Fortress wall (that will be a future blog post). The nice thing about this gate is that you can actually walk inside it.


At the end of the Seoul Fortress hike (or the beginning if you go the other way) is Changuimun—one of the four small gates. Its directional name is Buksomun ("north small gate").


Finally, on the east side of town is Hyehwamun, otherwise known as Dongsomun ("east small gate"). The painting on its wooden underside is quite colorful.


As for the remaining small gate that still exists, I know why I failed to visit it. The gate is called Gwanghuimun officially or Namsomun directionally ("south small gate"). There is another gate in Seoul called Gwanghwamun, which I did capture (another future blog post). I confused their names and thought that I had already visited all of the gates.

Next time perhaps?

Jack-o'-Goomba

Would you believe I had never carved a pumpkin before? This was fun, albeit entirely unoriginal.

I placed this pumpkin on an existing lamp base that's barely out of frame. I bounced my flash off the ceiling to illuminate the exterior of the pumpkin. Other than clone stamping out the bright light bulb in the Goomba's belly area, this photo is pretty much unedited.

Sunday, October 27, 2013

Limousine Bus

As I continue to go through my Korea photos, I'm still finding ways to categorize and separate photos into potential blog posts. So I present to you some transportation-related images. This first one is from the awesome "Limousine Bus" that we took from and back to Incheon International Airport (ICN). The seats are wide and comfortable with foot rests and backs that recline generously. It's a great way to get from the airport to the city (about an hour drive).


Once you're in the city, of course, the main transportation system is the Seoul Metropolitan Subway. The T-Money card is the way to go. You load up the card with however much Korean Won (KRW) you think you need and reload when it runs low. Not only convenient, it saves you 100 KRW on each trip compared to buying a new ticket every time.


The subway stations are probably the safest in the world. You don't have to worry about crime—I never even felt in danger of being pickpocketed—and you are completely separated from the trains until they arrive and the doors open.


This is a common sight. Pretty much everyone is on their phone.


Pil-Li-Pin! I couldn't resist capturing and including this sign.


If I remember correctly, this memorial wall is located in one of the Gwanghwamun subway station tunnels.


Moving away from the subway, the free Wi-Fi on the KTX bullet train was invaluable.


Finally, here is a policeman conducting traffic (a fairly common sight). I just like the photo for some reason.

Saturday, October 26, 2013

Seoul Street Markets

Street markets are part of the heart and soul of Seoul. On our first day out, we decided to hit up Myeongdong, one of the primary shopping districts in the city. The blog post title is perhaps misleading—Myeongdong is more about brand name shops and department stores as opposed to what you might think when you hear "street market."


I've read Myeongdong compared to The Grove in LA. In fact, we ran into a crowd and discovered this Korean celebrity (Choi Kang-hee) being interviewed on a show that is supposedly similar to Access Hollywood.


The next two photos were taken along the sidewalk just outside Deoksugung Palace.


Finally, there's the famous Namdaemun Market. This is probably closer to what one might expect out of a street market. Cheap souvenirs, inexpensive knockoffs—it's all here in this sprawling maze.


This lady threw a folded cardboard box at me. I guess she was mad because I was taking a photo. So of course, I'm going to post it. Too bad I was a little slow on the trigger.

Wednesday, October 23, 2013

War Memorial of Korea

One of the stops along the Seoul City Tour Bus route is the War Memorial of Korea. I'm usually not into this kind of stuff, but I found the museum to be much more detailed and interesting than I expected. They even have a neat scale model of a Korean gate (last photo) that you can walk up and over.


Tuesday, October 22, 2013

Namsan Martial Arts

It's been about five months since we returned from Korea and about four since I last blogged about it. Yes, I'm still not done. But since our Halloween costumes and my coffee obsession have put me in the mood lately, I'll try to keep the momentum going.

These are just a trio of photos from our quick stop at Namsan. On our way to installing our LOL, we caught this traditional martial arts demonstration.


Monday, October 21, 2013

I've Gone Naked

As my ever evolving coffee geekery expands, I'm finding more ways to spend money on equipment. My latest experiment has me diving head first into the realm of the naked portafilter.

The main idea behind the naked (or bottomless) portafilter is that you can better troubleshoot your espresso shot by clearly seeing what's going on during the pull. If things don't go so well, you might get errant sprays of coffee making a mess everywhere, indicating a poor or uneven extraction. If things go perfectly, the coffee comes out evenly and you get a beautiful stream, hopefully corresponding to a nicely extracted cup of espresso.


Clockwise from the top-left, you can see my espresso machine's portafilter handle, the plastic spout that I sawed off, the original pressurized double shot basket, and the new unpressurized basket that I ordered online. For the most part, I had to saw off the plastic spout because the new basket wouldn't fit otherwise. The added side effect is that I now have a bottomless portafilter. No turning back now. It's more fun and satisfying this way anyway.


Yes, I've definitely gone coffee crazy over the past three months. Here is the setup I've accumulated so far.

I started with the Delonghi EC155—probably the most entry-level espresso machine out there. When I began, I bought pre-ground coffee from Illy, then got my feet wet with the Porlex hand grinder, and finally graduated to the Baratza Preciso grinder on the left. The hand grinder will still be useful when we go camping.

For the mornings when I don't feel like making espresso, I bought a Clever Coffee Dripper. It's a hybrid between a full immersion and a drip coffee system. That might also come in handy when we go camping.

Saturday, October 19, 2013

Human Nigiri

I was looking up couples costumes when I found the idea to dress up as sushi. My immediate reaction was, "I can make that!" About $15 of materials and several nights later, we had our outfits. The bonus is that I can simply wrap them around a couple of regular white pillows and now we have sushi pillows! That's a big plus because this was not a trivial amount of sewing. (Maybe one day I'll get a sewing machine).

The following is a hasty Photoshop job. It's good enough for my blog.


I was basically following an Instructable I found. I started with a couple of yards of orange fabric I snagged on sale. I cut up a paper shape for the shrimp until I was happy with it.


After cutting the shrimp fabric, I laid out the white ribbon that would be the stripes and sewed them into place.


I repeated this for the salmon. That one is just a basic rectangle, so I didn't use a template, but I did use the shrimp as a size guideline.


Once the stripes were sewed in place, I laid another (mostly) identical piece of orange fabric on top and sewed them together around the edges to form the pillow.


Unfortunately, I failed to document the rest of the creation process. Essentially, I created two custom (though far from professional) pillows. All that was really left was to add the stuffing and close them up. To act as the nori that would bind the fish to the rice (the rice being us), I bought some velvety black fabric (to replicate the sheen of nori).

For the headpieces, I created some wasabi and ginger using bright green and pink fabric. By this point, I completely forgot to take in-progress photos, so all we have is the finished product.


My version of the headpiece, as modeled by Bawoo, has my rendition of the green plastic thingy that they usually include in to-go boxes.